How to Improve Uttanasana: 5 Preparatory Exercises That Actually Work
When you hear that this blog will help you improve your Uttanasana (Standing Forward Bend), you might immediately think it will teach you how to touch the floor with your hands or bring your head to your knees. Surprisingly, that's not what this blog is about.
As I've mentioned in my previous articles, the goal of Yoga is not to force yourself into the final shape of a pose. The true measure of improvement is not how deep you go, but whether you understand and maintain the intention of the posture. When you practice with the right intention, you move away from only chasing flexibility or allowing your ego to dictate your practice.
The primary intention of Uttanasana is to create length through the entire posterior chain, including the hamstrings, calves, glutes, and the spinal muscles. Once you understand this purpose, your practice becomes more mindful, effective, and safe. Without this understanding, we simply end up copying the external appearance of the pose rather than experiencing its true benefits.
Equally important is understanding correct alignment, which helps you recognize which joints should move, which muscles should lengthen/contract, and how to avoid unnecessary strain. For most people, the biggest limitations in Uttanasana are tight hamstrings, restricted calf muscles, limited movement of the pelvis or ankle, and stiffness along the spine.
These limitations may be either structural or functional. Structural limitations are related to your natural anatomy, such as bone shape or body proportions, and they should be respected. Functional limitations, on the other hand, develop over time due to factors like a sedentary lifestyle or lack of mobility. Fortunately, functional limitations can often be improved with appropriate preparation and consistent practice.
In this article, you'll learn 5 preparatory exercises that target these key movement restrictions. Rather than forcing yourself deeper into the fold, these exercises will help you improve the mobility, flexibility, and hip hinge patterns required for a safer, more efficient Uttanasana. Let's Begin:
1. Supta Padangusthasana (Reclining Hand-to-Big-Toe Pose)
Aim
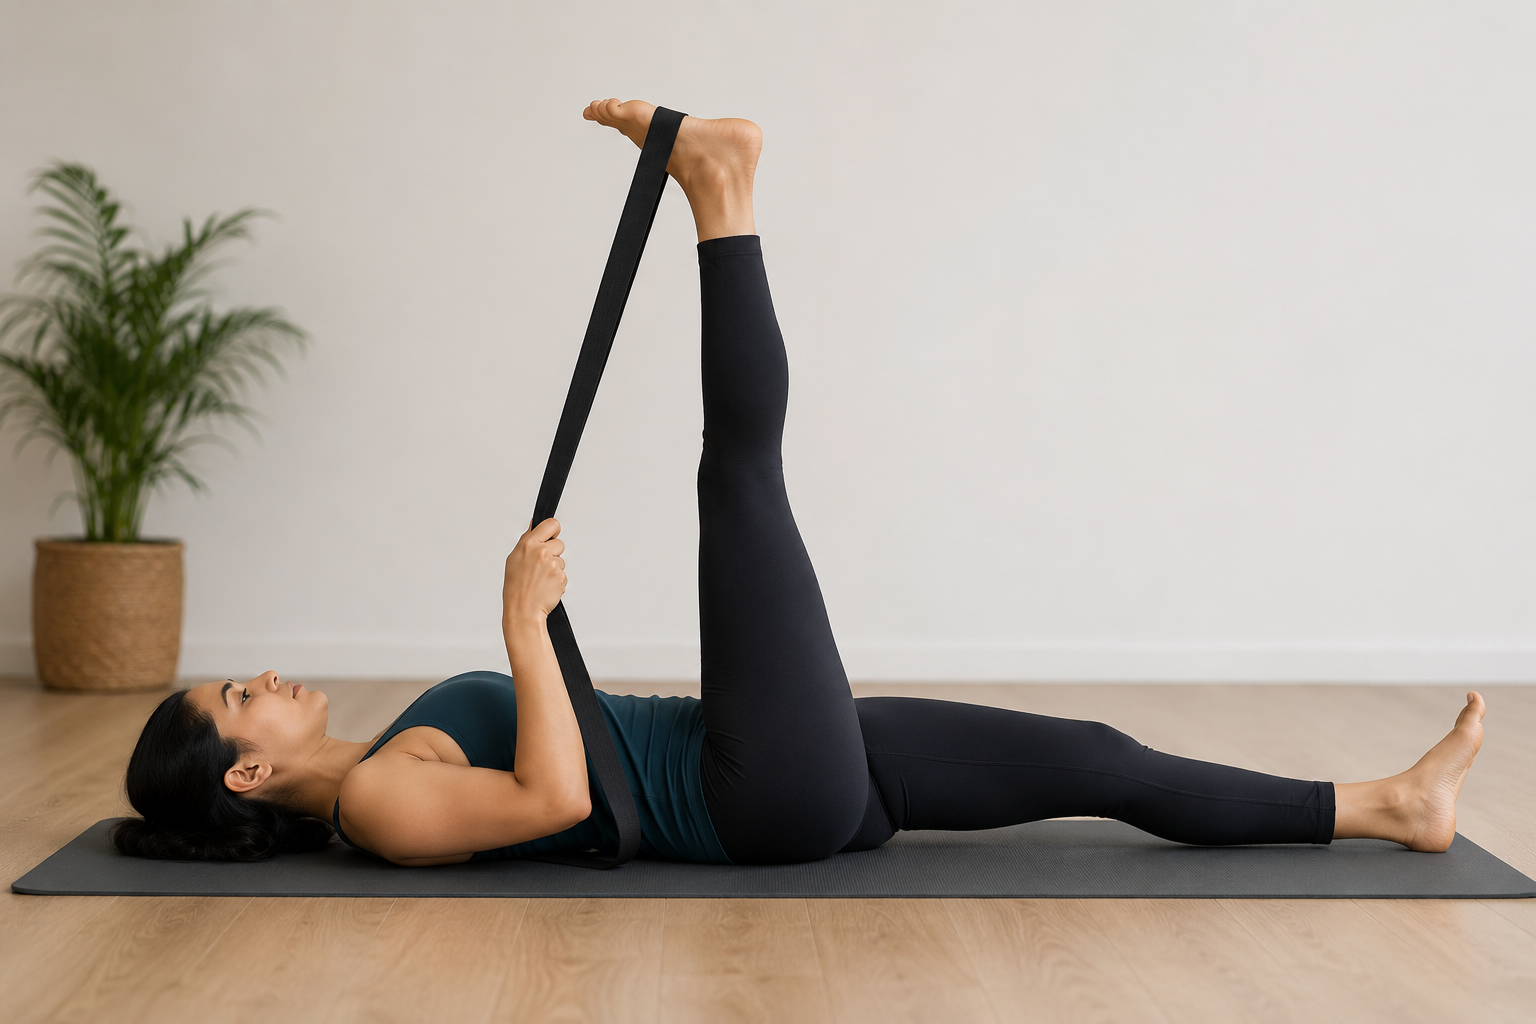
The aim of this exercise is to improve hamstring flexibility while maintaining a neutral spine and stable pelvis. Using a yoga belt allows you to isolate the hamstrings without excessive strain on the lower back, making it easier to develop the hip flexion required for Uttanasana.
Instructions
Lie on your back with both legs extended.
Loop a yoga belt around the ball of one foot.
Hold one end of the belt in each hand and slowly raise the leg towards the ceiling.
Keep the opposite leg extended on the floor with the toes pointing upwards.
Maintain a neutral pelvis and the natural curve of the lumbar spine throughout the exercise.
Gently pull on the belt until you feel a comfortable stretch along the back of the raised thigh.
Hold the stretch for 30–40 seconds, breathing normally, then repeat on the opposite side.
Key Points
A. Keep the raised knee fully extended without locking the joint or forcing hyperextension.
B. Keep both sides of the pelvis evenly grounded on the floor and avoid lifting the opposite hip.
C. Use the belt to maintain a comfortable stretch without pulling the leg beyond your available range of motion.
D. Keep the neck, shoulders and jaw relaxed throughout the exercise.
Common Compensation
A common compensation is pulling the leg too close to the body, causing the pelvis to tilt posteriorly and the lower back to flatten against the floor. Instead, keep the pelvis stable and allow the hamstrings—not the lumbar spine—to be the primary structure being stretched.
2. Janu Sirsasana with belt
Aim
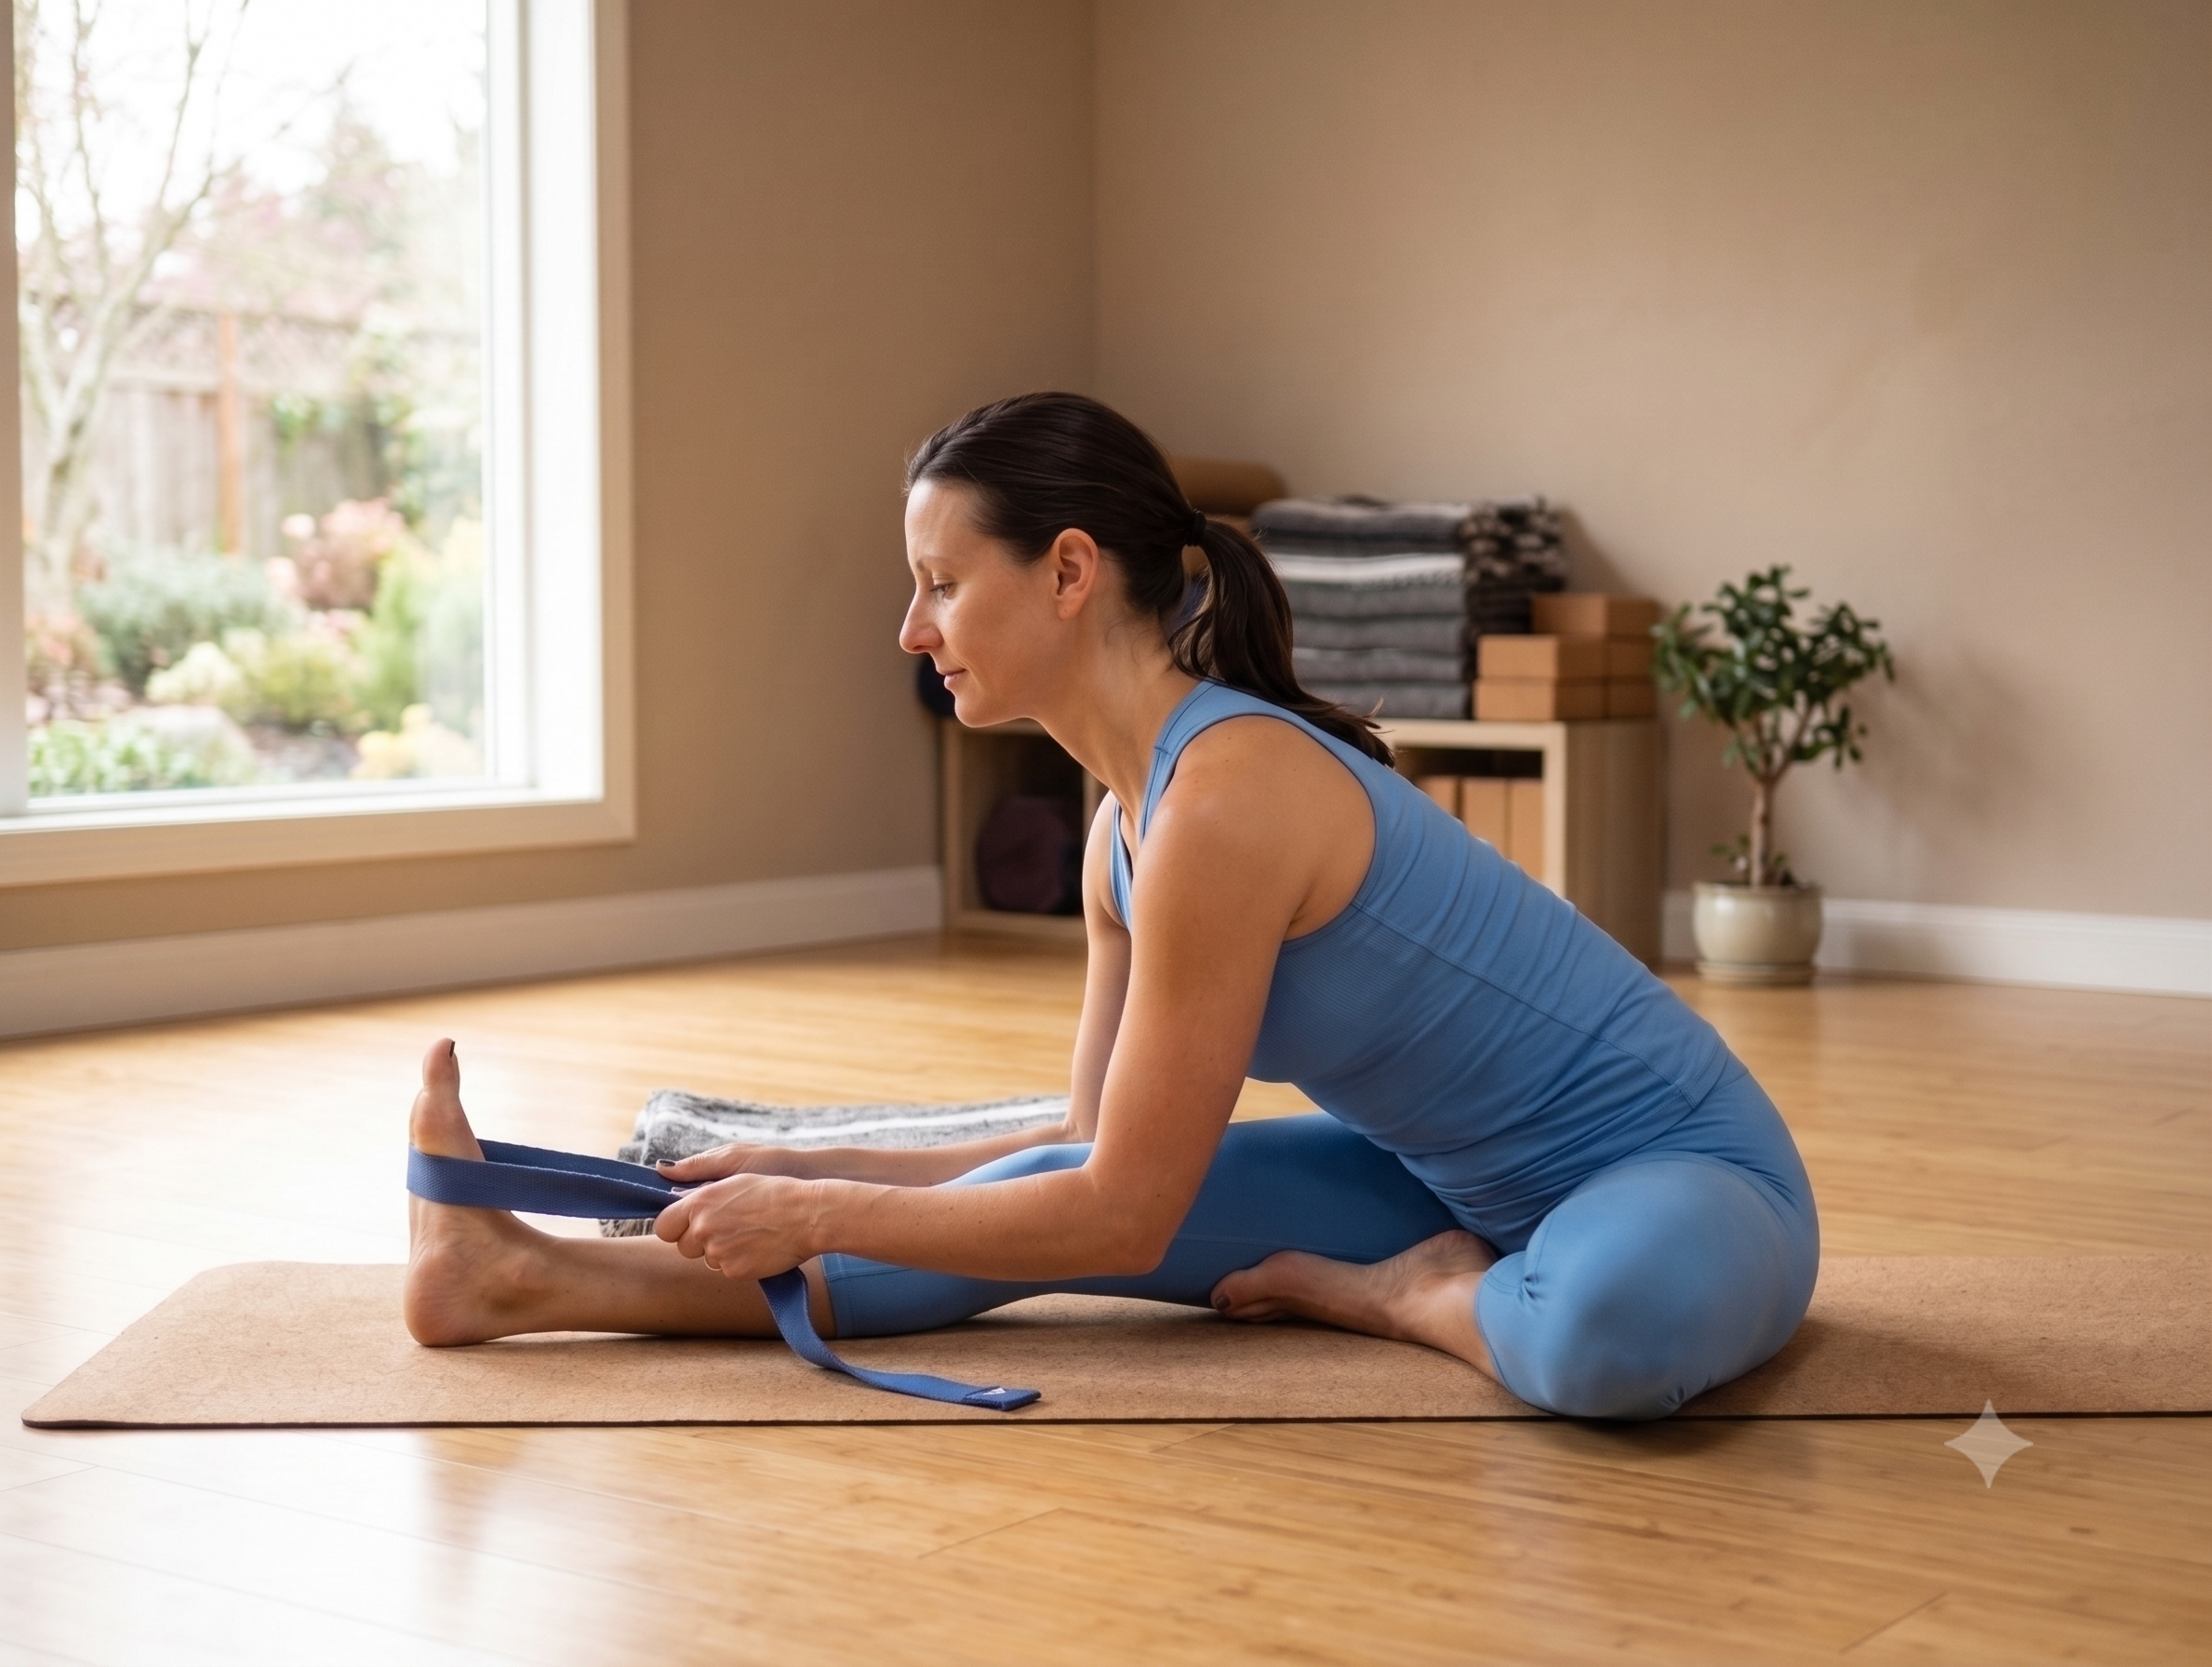
The aim of this exercise is to improve hamstring flexibility while promoting an efficient hip hinge. Using a yoga belt allows you to deepen the stretch without rounding the lower back, helping improve the hip flexion required for Uttanasana.
Instructions
Sit on the floor with one leg extended in front of you and the opposite knee bent, placing the sole of the foot against the inner thigh of the extended leg.
Loop a yoga belt around the ball of the extended foot.
Hold one end of the belt in each hand and keep the extended ankle in dorsiflexion (toes pointing towards the shin).
Sit tall with the chest lifted and maintain the natural curve of the lumbar spine.
Initiate the movement with an anterior pelvic tilt, then hinge forward from the hips while keeping the spine long.
Gently pull on the belt only as much as needed until you feel a comfortable stretch along the back of the extended thigh.
Hold the position for 30–40 seconds, breathing normally, then repeat on the opposite side.
Key Points
A. Initiate the forward bend from the hips rather than rounding the spine.
B. Keep the extended knee fully straight and the ankle in dorsiflexion throughout the stretch.
C. Maintain a neutral pelvis and avoid collapsing or rounding the lower back.
D. Use the belt as an aid to maintain spinal alignment rather than to force a deeper stretch.
Common Compensation
A common compensation is reaching the head towards the knee by rounding the spine instead of hinging from the hips. Rather than trying to touch the forehead to the leg, focus on rotating the pelvis forward and maintaining a long spine. The depth of the stretch is less important than the quality of the movemen
3. Ardha-Uttanasana with the Chair
Aim
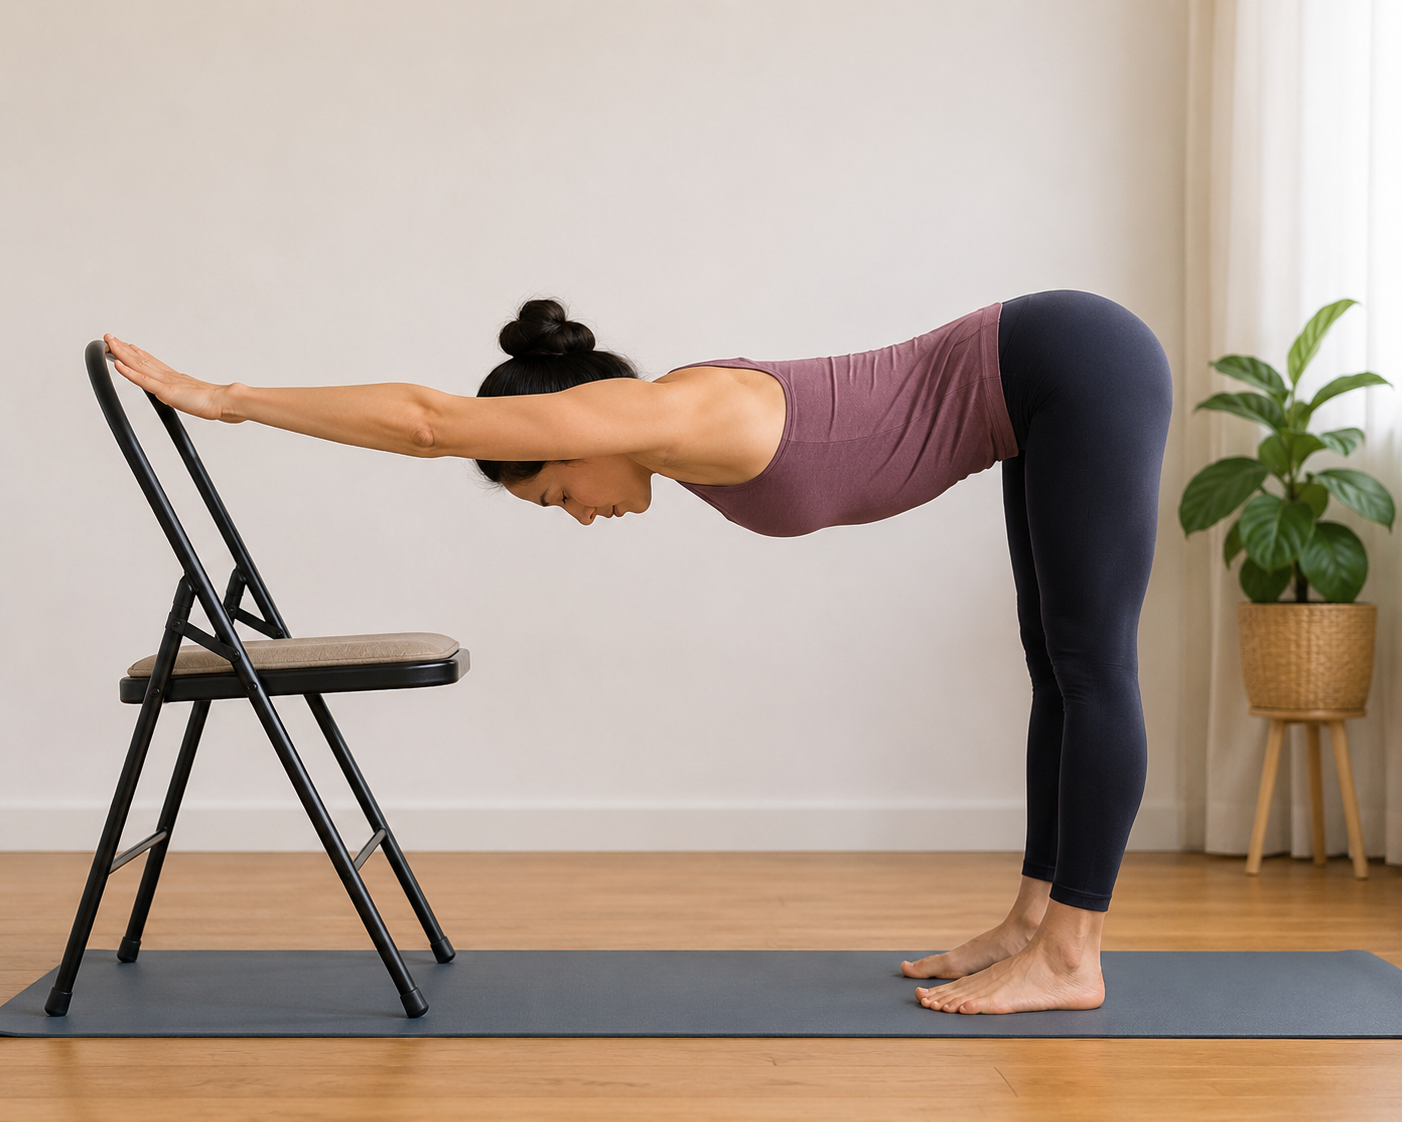
The aim of this exercise is to improve the hip hinge pattern while gently stretching the hamstrings and lengthening the spine. Using a chair provides support, allowing you to maintain a neutral spine and minimize compensatory rounding of the lower back, making it easier to perform Uttanasana with proper alignment.
Instructions
Stand facing a sturdy chair with your feet hip-width apart.
Place your hands on the top of the chair's backrest and step backward until your arms are fully extended.
Hinge from your hips by moving your pelvis backward while keeping your spine long and neutral.
Continue walking your feet back if needed until your torso is approximately parallel to the floor and you feel a comfortable stretch in the hamstrings.
Press your hands gently into the chair to help lengthen the spine without collapsing through the shoulders.
Keep your neck relaxed and your gaze directed toward the floor.
Hold the position for 30–40 seconds while breathing slowly and evenly.
To come out of the pose, walk toward the chair and slowly return to an upright standing position.
Key Points
A. Initiate the movement by hinging from the hips rather than bending through the waist. Maintain the natural curves of the spine throughout the pose.
B. Keep the knees straight but not locked. If the hamstrings are very tight, maintain a slight bend in the knees while preserving the hip hinge.
C. Press the hips backward and actively lengthen the spine from the hands to the pelvis instead of trying to force the chest toward the floor.
Common Compensation
Many people compensate by rounding the thoracic and lumbar spine instead of hinging from the hips. This decreases the stretch on the hamstrings and reinforces an inefficient movement pattern for Uttanasana. Focus on moving the pelvis backward first, maintaining a neutral spine, and allowing the hamstrings to gradually lengthen rather than forcing a deeper forward bend.
4. Seated Hamstring Stretch on a Chair
Aim
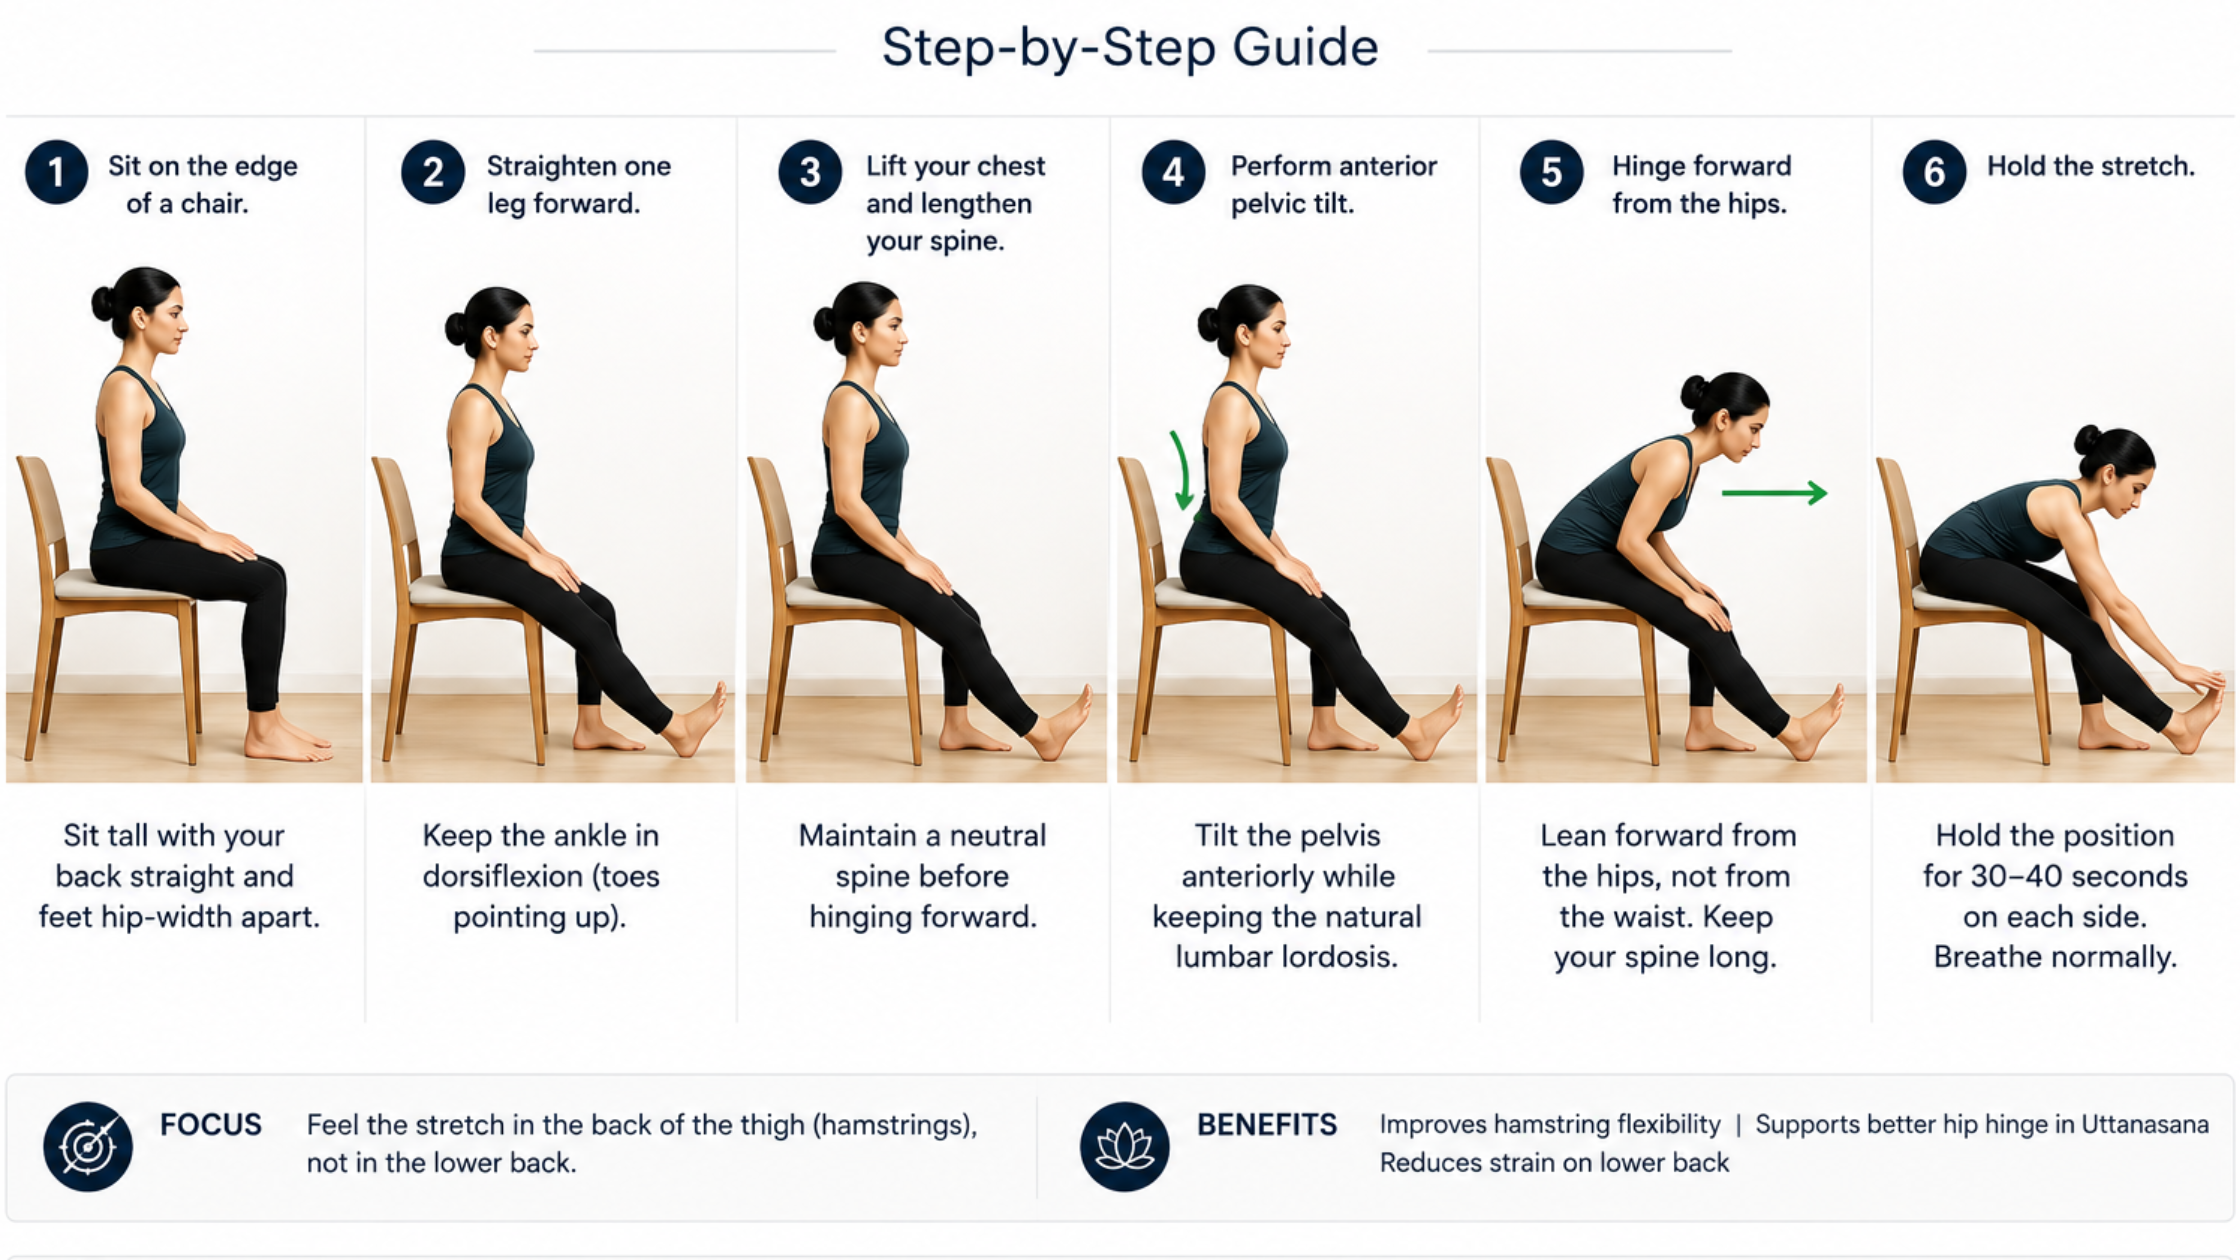
The aim of this exercise is to improve hamstring flexibility while minimizing compensatory movement from the lumbar spine. By isolating the hamstrings, you can increase hip flexion range of motion, making it easier to perform Uttanasana with an efficient hip hinge.
Instructions
Sit on the edge of a chair with one foot firmly on the floor.
Straighten the opposite leg in front of you with the ankle in dorsiflexion (toes pointing towards the shin).
Maintain a neutral spine with your chest lifted.
Initiate the movement by performing an anterior pelvic tilt, then hinge forward from the hips while maintaining the natural lumbar lordosis.
Continue hinging until you feel a comfortable stretch along the back of the thigh.
Hold the position for 30–40 seconds, then repeat on the opposite side.
Key Points
A. Hinge forward from the hips while maintaining the natural curves of the spine.
B. Keep the stretching knee fully extended and the ankle in dorsiflexion throughout the exercise. If full knee extension is uncomfortable, maintain a slight bend without losing the hip hinge.
C. Avoid rounding the lower back (lumbar flexion) so the stretch remains focused on the hamstrings rather than being compensated for by the spine.
Common Compensation: Many people compensate by rounding the lower back instead of rotating the pelvis forward. This reduces the stretch on the hamstrings and reinforces an inefficient movement pattern for Uttanasana. Focus on initiating the movement with an anterior pelvic tilt and hip flexion before increasing the depth of the stretch
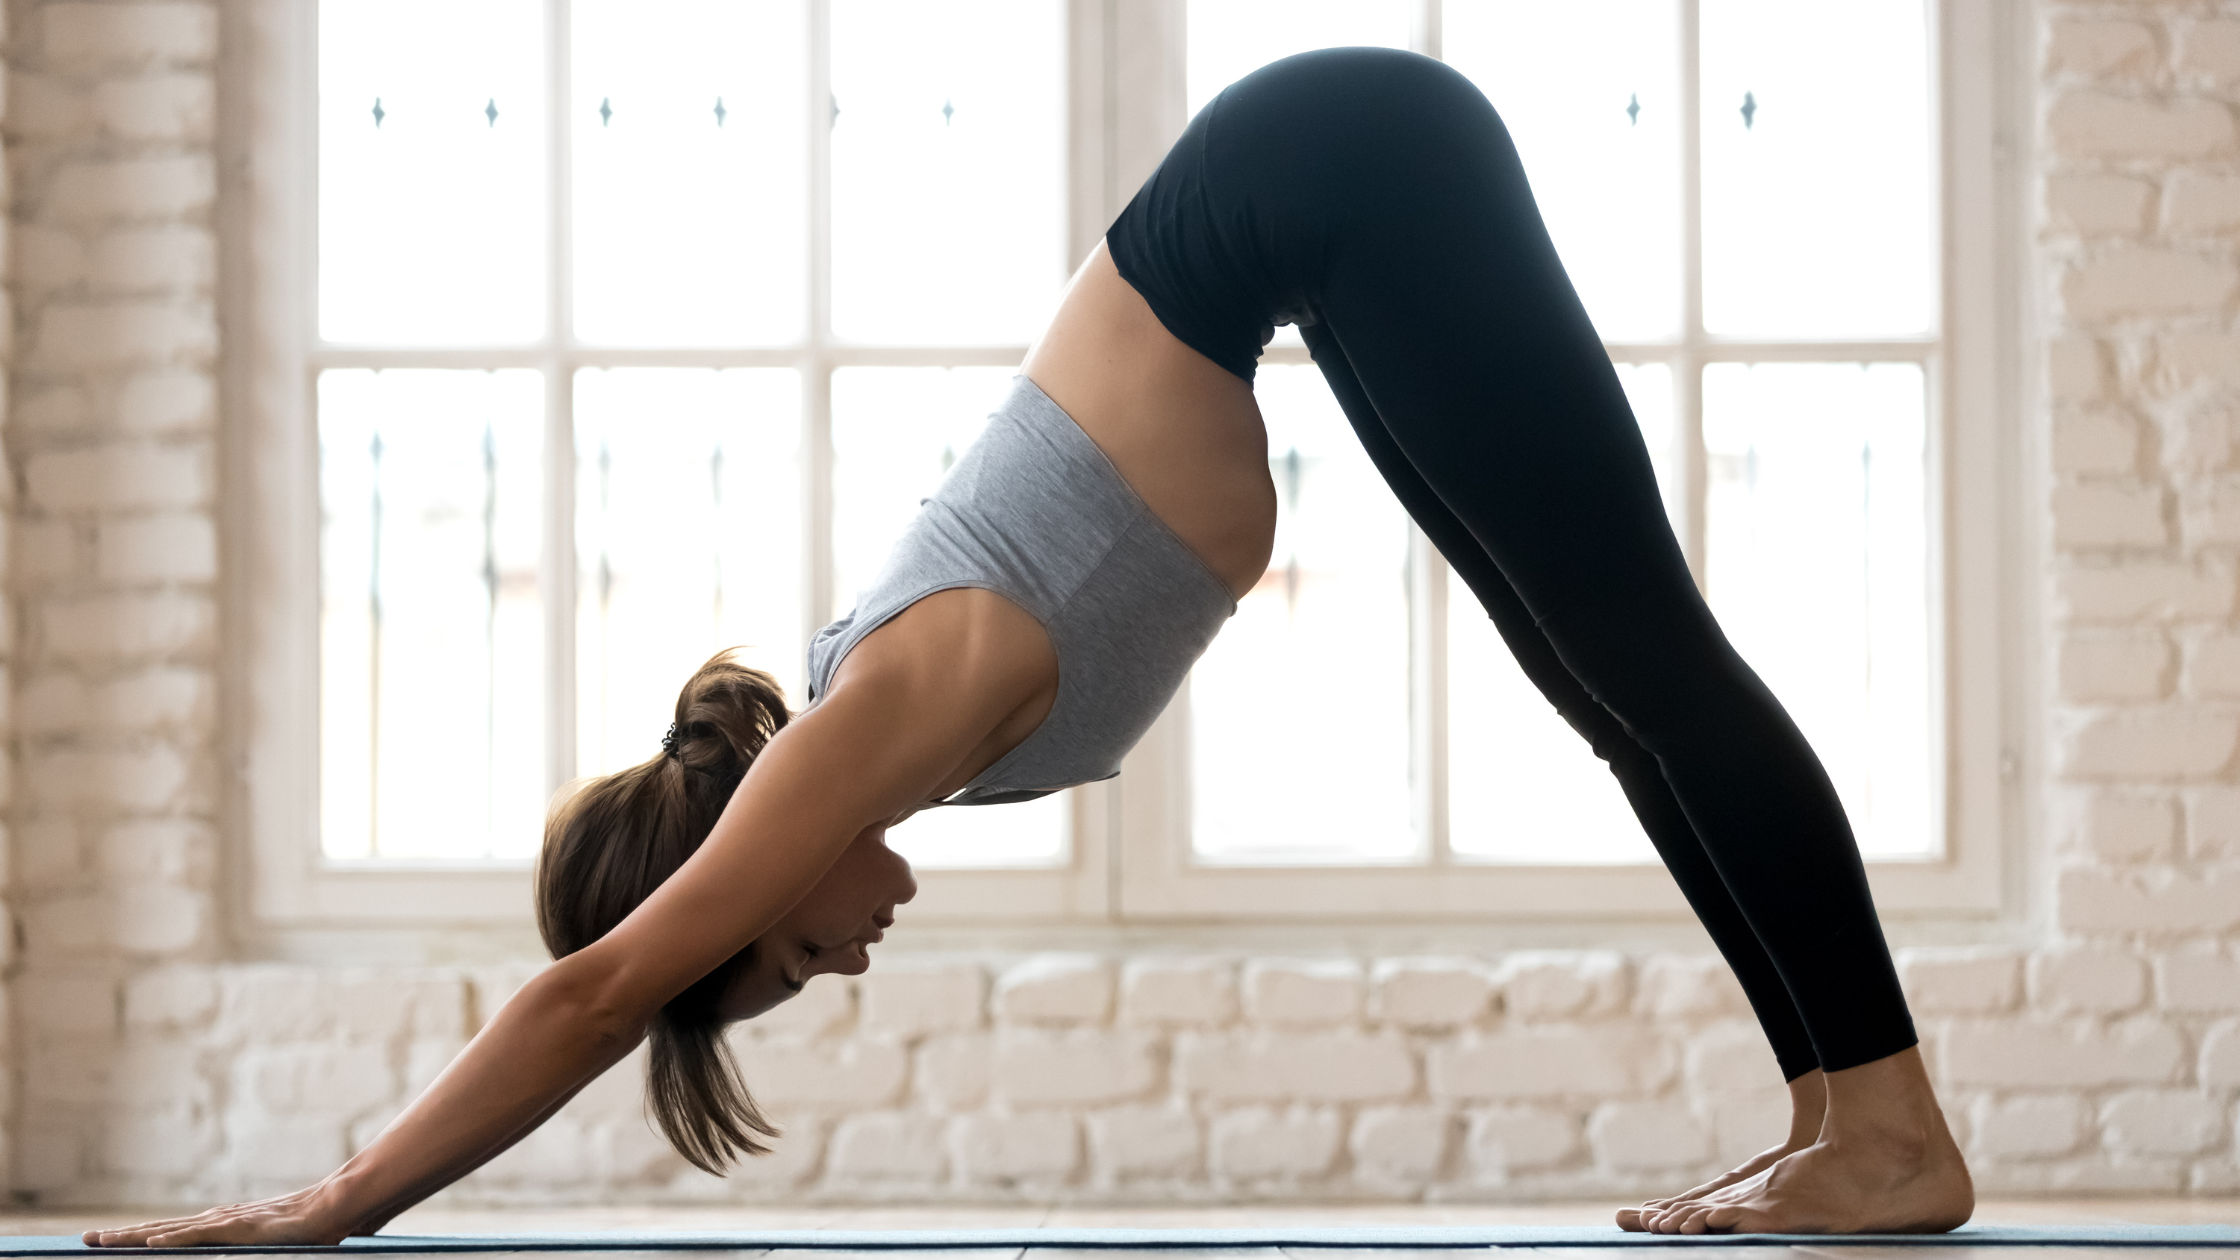
5.Adho Mukha Svanasana (Downward-Facing Dog)
Aim
The aim of this exercise is to improve hamstring flexibility, calf mobility, and shoulder flexibility while reinforcing a proper hip hinge and spinal elongation. By lengthening the entire posterior chain, Adho Mukha Svanasana helps prepare the body for Uttanasana by increasing hip flexion range of motion and reducing excessive strain on the lower back.
Instructions
Begin on your hands and knees in a tabletop position with your wrists under your shoulders and knees under your hips.
Spread your fingers wide and press firmly through your palms.
Tuck your toes under and lift your knees off the floor.
Press your hips upward and backward, gradually straightening your legs as much as your flexibility allows.
Lengthen your spine by pushing the floor away with your hands while reaching your sitting bones toward the ceiling.
Allow your heels to move toward the floor without forcing them to touch.
Relax your head between your upper arms and keep your neck in a neutral position.
Hold the pose for 30–40 seconds, breathing slowly and evenly.
To come out of the pose, gently lower your knees back to the floor and return to the tabletop position.
Key Points
A. Prioritize lengthening the spine before attempting to straighten the knees. A long spine is more important than placing the heels on the floor.
B. If the hamstrings are tight, keep a slight bend in the knees while continuing to lift the hips upward and backward.
C. Press evenly through both hands, externally rotate the upper arms slightly, and keep the shoulders away from the ears to maintain stability through the shoulder girdle.
Common Compensation
Many people compensate by rounding the spine or forcing the heels to the floor, which shifts the emphasis away from the hamstrings and limits spinal elongation. Others collapse into the shoulders or excessively arch the lower back. Focus on creating length from the hands to the hips first, maintaining a neutral spine, and allowing the hamstrings and calves to lengthen gradually over time.
Frequently Asked Question


